Had a good clear night, this is with the ASI178MC running at gain 250 and no moon to get in the way.
Allsky Timelapse 2023-02-23
Leave a Reply
Had a good clear night, this is with the ASI178MC running at gain 250 and no moon to get in the way.
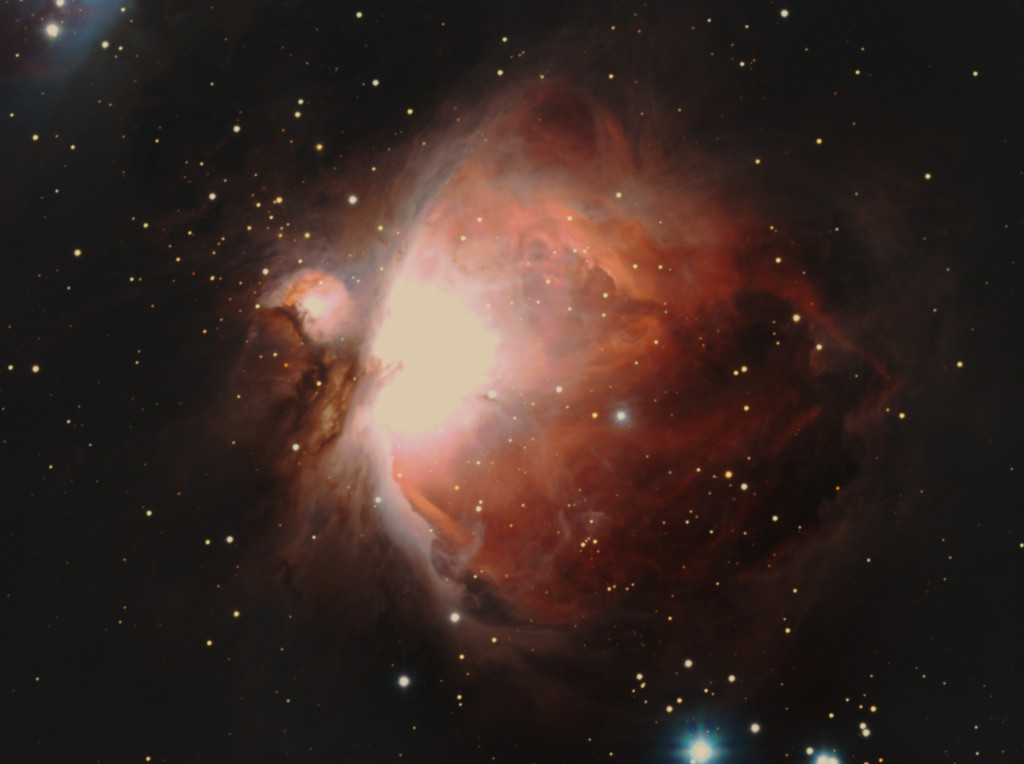
Had a go at the orion nebula yesterday. First outing in a long time, just 30 x 5min exposures, with some Ha. Here is the first stab:
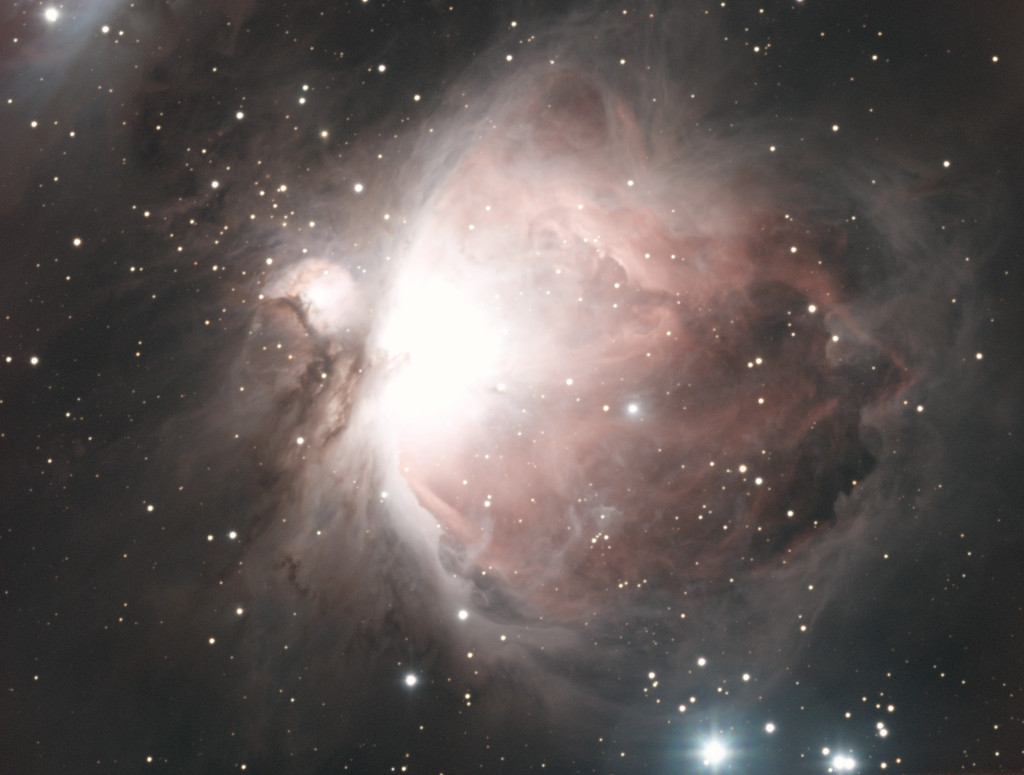
After a day or two, I decided to look again, and see what we can pull out of the data. Two and a half hours of capture roughly equates to about 1 Gigabyte, so there is a lot that can be done. Here is the final that I will settle with on this acquisition:
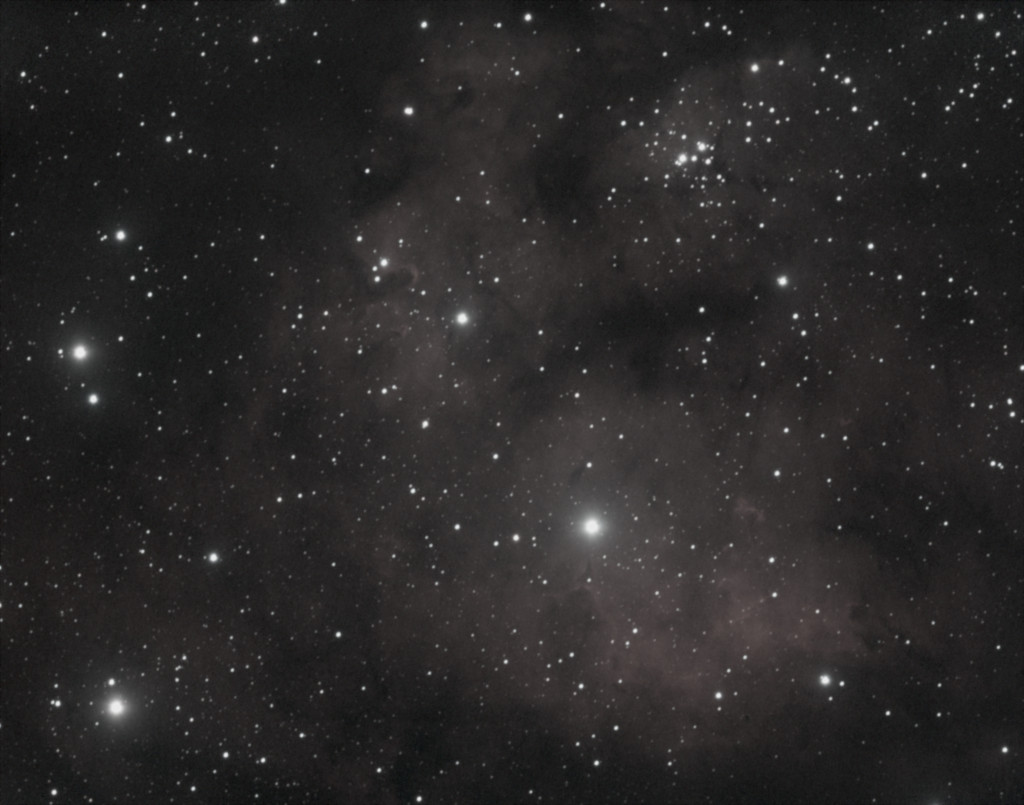
I have been continuing to get data for NGC7822, although I’m yet to obtain quite a few narrowband subs as yet, so we’re not seeing quite the detail or colour I would like. I also think I will have to increase the length of my narrowband subs.
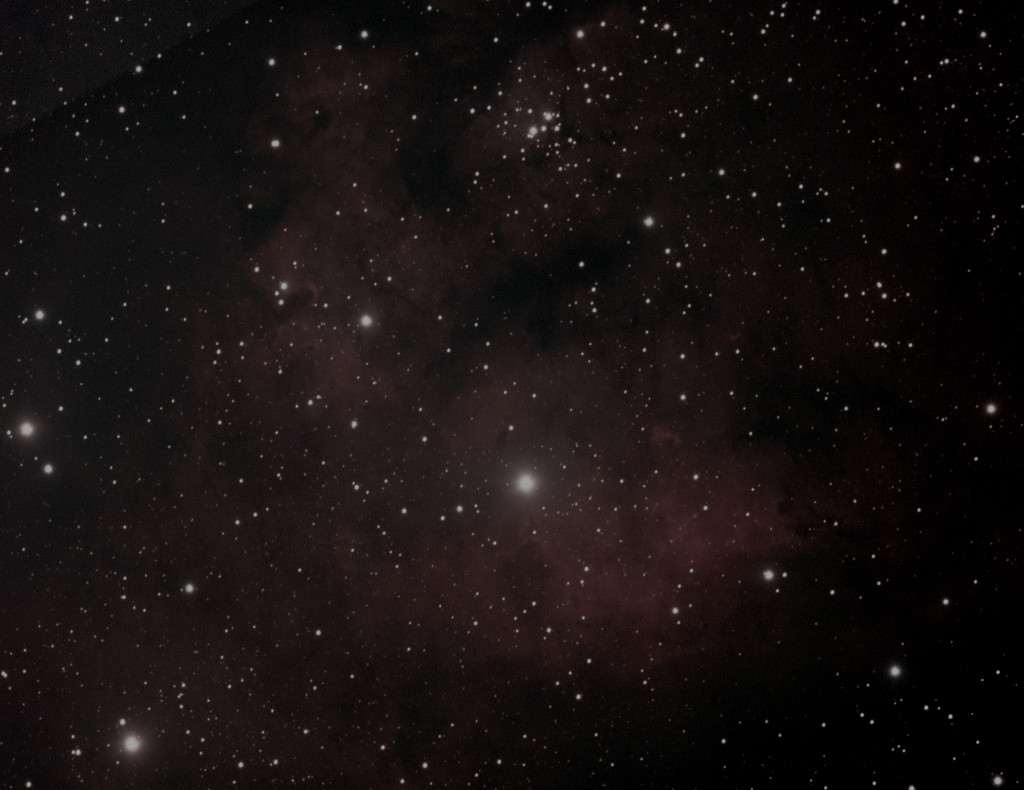
Anyway, here is another integration result, with still minimal post-processing as there isn’t much point working on the data too much until I have a full set and can start discarding the sub-optimal exposures.
I’ve been experimenting with the new set up, and what with the weather there are a lot of software changes to account for.
The following is an image of NGC7822, a random target that I’ve put on while I run through bugs and problems, mostly arising from lack of having been able to regularly use the equipment due to the current weather.
I’ve not bothered too much with post processing, just a quick, mostly automated workflow, and then quick levels adjustment with Gimp.
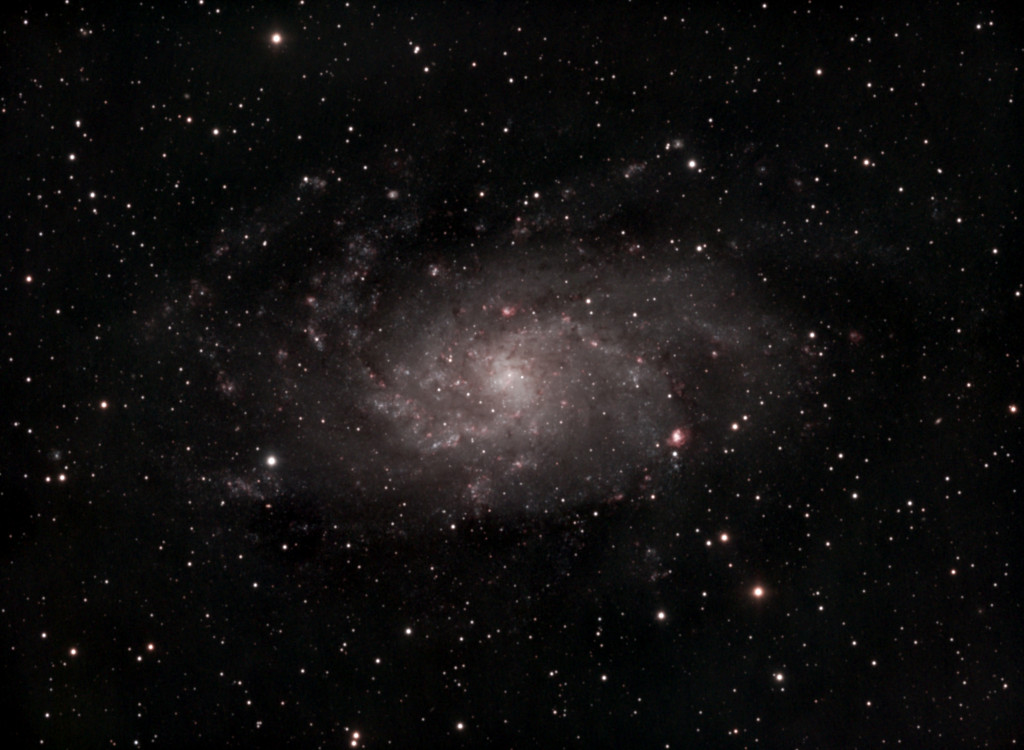
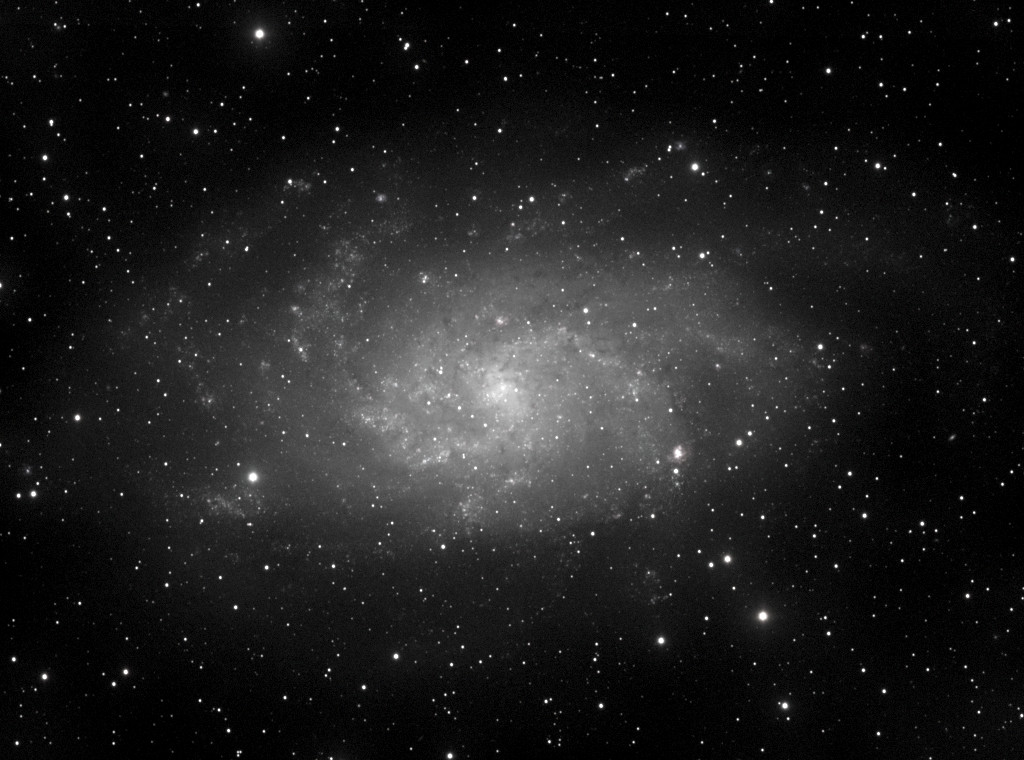
I continued to grab more data for M33, and have added the Hydrogen Alpha in a slightly different way to before, although I wasn’t able to get any more sub-exposures for Hydrogen Alpha due to software issues. Still think I need to continue to add more data.
Focusing is actually working well now, although the focuser appeared to want to refocus far too often. Guiding was also being suspended during focusing. I think we will now manually move the focuser to 83000 steps at the beginning and probably limit travel to 1500 steps in either direction or so, and work with much smaller initial steps (initial step 200, max step 300). This should allow me to refocus often and quickly and not have to suspend guiding during focusing, which appeared to be an issue.
I am hoping some Kstars updates to Astroberry in the near future will sort some of the software issues I have experienced last night.
So, just a video that looks at the Pegasus PPBA, and how it will go with the RPI4, replacing “The Box”, but providing us with some extra functionality:
So, to start the Esprit Journey proper, we chose a simple, single frame target, which we visited before in 2019. The capture session was live, but here is the first draft of post-processing the data:
This is clearly superior to the Startravel 120T!
Here is the capture session in progress, recorded live, exposure by exposure, I apologise for not being an active commentator, and lots of sounds in the background:
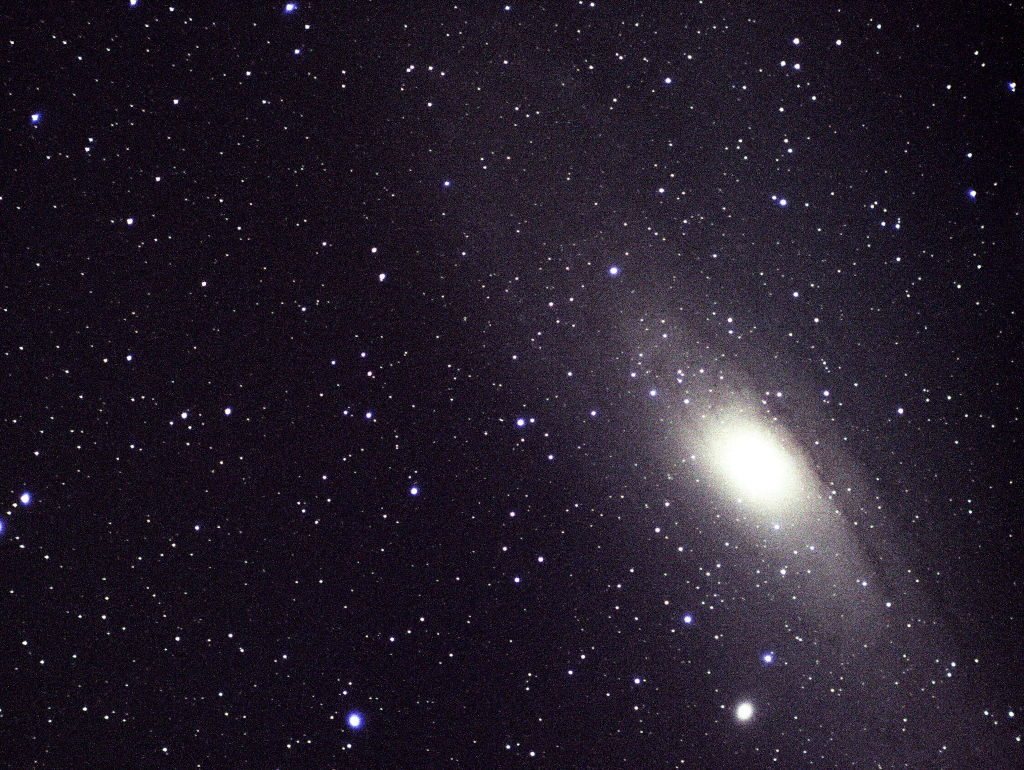
So we had a brief night of viewing, and as this is likely to be the last time using the StarTravel 120T I thought we would end where we started, with Andromeda.
The results are not great, it is a Luminence only capture, with a mono camera, a mosaic of three panes, and you can clearly see the egg-stars caused by the chromatic aberration that the StarTravel exhibits. The StarTravel gets really good results with Narrowband imaging, but not when trying to get true colour. I intend this to be the first target with the Esprit soon, and hopefully we will see quite a difference to compare the two against each other – you need to be reminded that the Esprit costs probably around 8x more than the StarTravel, and everything I’ve posted here so far was achieved using the StarTravel.
I have not bothered to perform much post-processing on this image, as I feel more compelled to focus efforts on new equipment, and hopefully better results.
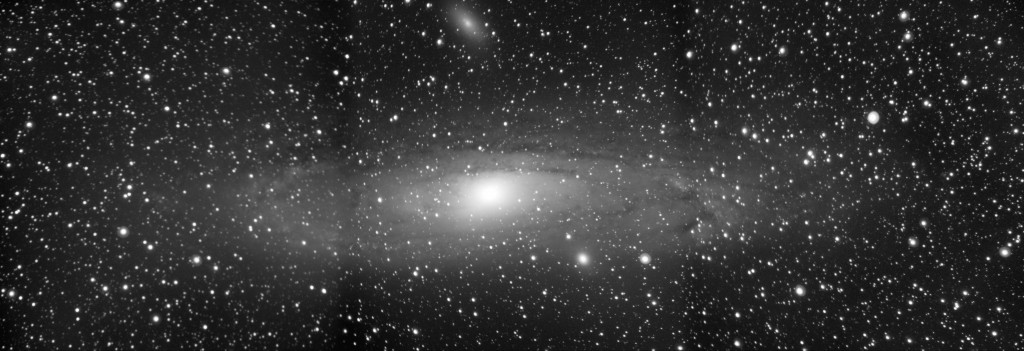
We can compare that, with my first ever astrophotography photo, although I believe this was LRGB at the time, so avoided the worst of the chromatic aberration by re-focusing for each colour filter.
We are looking at the SkyWatcher (or Celestron) PowerTank 17ah, for use at dark sky sites away from home, to provide a constant 12V, upto 10A power over 17Ah of powerstaoge.
Obviously neither SkyWatcher nor Celestron manufacture this product. Here we show what its form factor capabilities are, and I will update you in time with how they perform:
Another quick look at the IDAS-P2 LPS Filter, for suppressing light pollution at your imaging / viewing site.
Also how it might fit into your imaging train, in advance of any other filters you might be using.
OK, so I took a delivery and this is the first look at the Primaluce Labs Sesto Senso v2, although I don’t yet have a compatible scope to attach it to.
It feels sturdy, and without further ado, here is the review:
Just a note about the 12V power connector, my previous HitecAstroDC focuser accepted a 2.1 centre positive connector, and I hoped I would be able to use that. Unfortunately the Sesto Senso v2 power connector appears to be a 2.5mm centre positive connector, so you would need to buy another cable to get rid of the cigarette lighter cable that comes with the device.
This is a quick video about “The Box”, the system I use that connects my equipment (via INDI), to my desktop indoors, and allows me to control everything without having to go outside.
Although it is sometimes enjoyable to go outside and watch some of the automation tasks, such as a meridian flip!
During the focus procedure on Friday night, I seem to have captured what I’m going to call “Musk Trails”. I expect this was part of a constellation of SpaceX Starlink satellites traversing my field of view while I was trying to focus.
Here is a still from the video:

Thanks Elon!
So, I did make a screen capture of the session on the 9th October, it is not particularly interesting as I was not really commentating throughout, had my webcam flap down for some reason, but you will see certain aspects – we are using the new SEP multi-star algorithm in Ekos, which is great for stability, it does show off the AS290MM mini, it shows how I have to manually focus every so often (APO and SestoSenso arriving soon will be greatly appreciated).
I would not expect anyone to watch this five hour marathon through from start to end, although if you happened to be watching it live it might be interesting if you were acquiring the same target, but certainly skipping through the footage, you might come across something I’m doing wrong, or right, and have some comments on my progress in this field.
Don’t expect so see the thumbnail in this video to appear in the video itself, this is the acquisition phase of individual sub-exposures, I will post a video on processing of the data, including this night’s, in a later video, when we’ve hopefully improve on the data substantially. The preview picture displayed is the accumulation of data so far, without any discarding of bad data so far.
I do have to wonder, how I will proceed when the APO arrives, it is a f/7 telescope, while these are taken on a f/5 telescope. Maybe I can proceed with a 3×3 mosaic, or something similar 3×2 or 2×3 and add to the data, or perhaps I need to choose to start all over again. APP will help when I start, as it will quantify the quality of the images I already have, and be able to merge frames from different optical equipment.
As always, if you are here as a genuine viewer with an interest in Astrophotography, then please leave a comment, I will moderate and reply if necessary.
So last night, we obtained some more Oiii sub-exposures in order to bring the number to the same level as our Hydrogen Alpha sub-exposures. I also started to obtain some Sii exposures, only managed 10 or so for each pane of the mosaic.
It looks like I should obtain more Hydrogen Alpha sub exposures as well now, as the quality does not appear to be as good as the other narrow-band wavelengths, and of course Hydrogen Alpha is a strong part of the composition.
You will notice we are now using a different palette for the RGB composition.
I probably need to flex up some of my GIMP processing skills as I still feel I am floundering around not really knowing what I am doing.
Anyway, without further ado, please find below the current rendition:

Here is a link to the online worldwide telescope
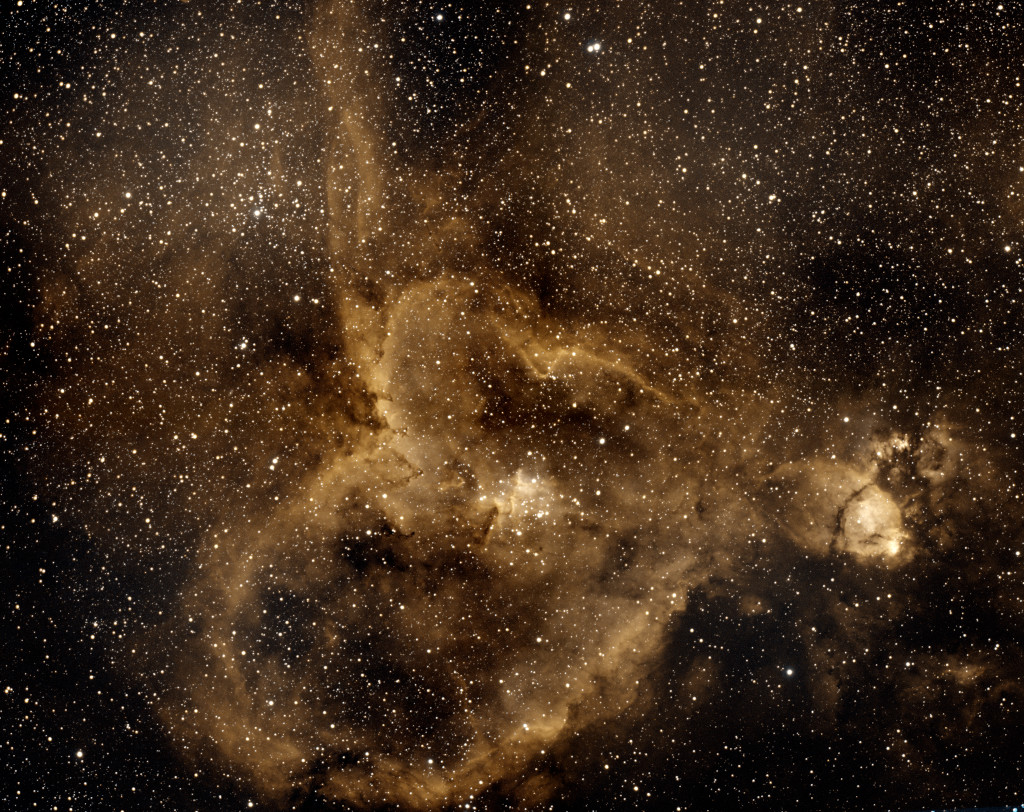
So I managed to get some extra frames for the Heart Nebula.
I’m now working with around 190 individual frames, so my registration and integration process is changing, as rather than just load all the frames and tell APP to work on them, the DDC is taking an inordinate amount of time, and I suspect that this also affects other processing later on.
So, now, we load each pane of the mosaic, and integrate them separately using a normal registration process. After which we then do a single mosaic registration and integration with the eight panes, 4 per channel of Ha and OIII.
Here are the results:
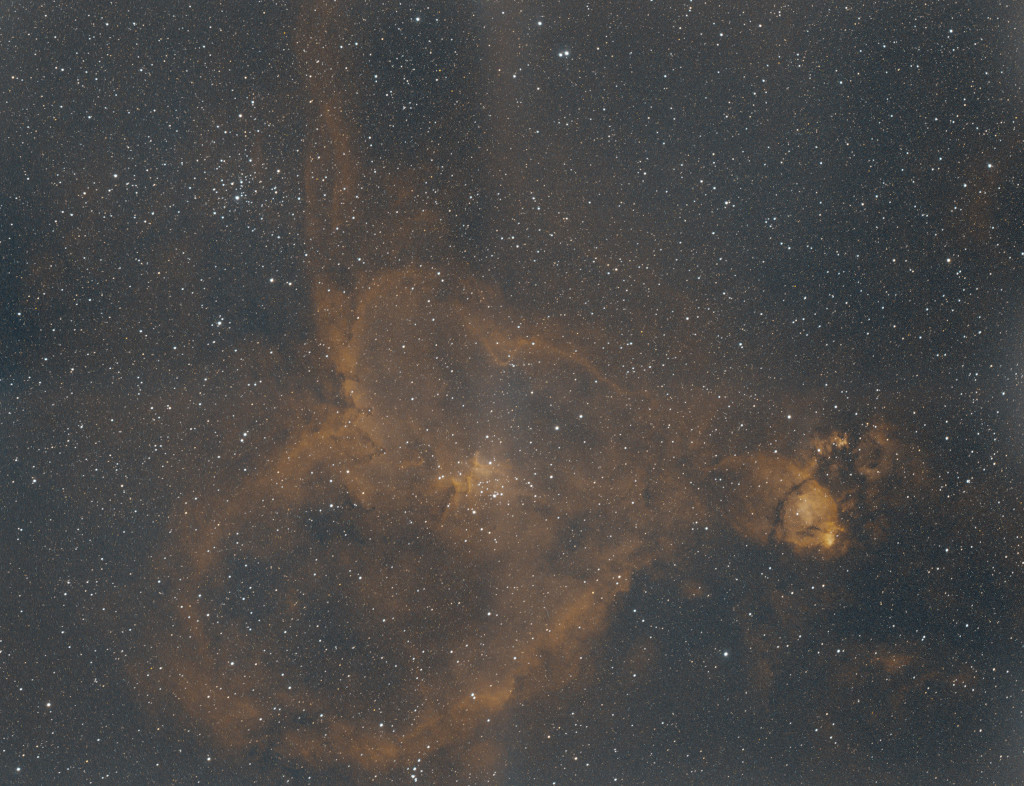
We can see here, how the detail comes, and aberrations recede as we add more data. Below, upper image is the intermediate, while the lower image is the original initial data acquired.
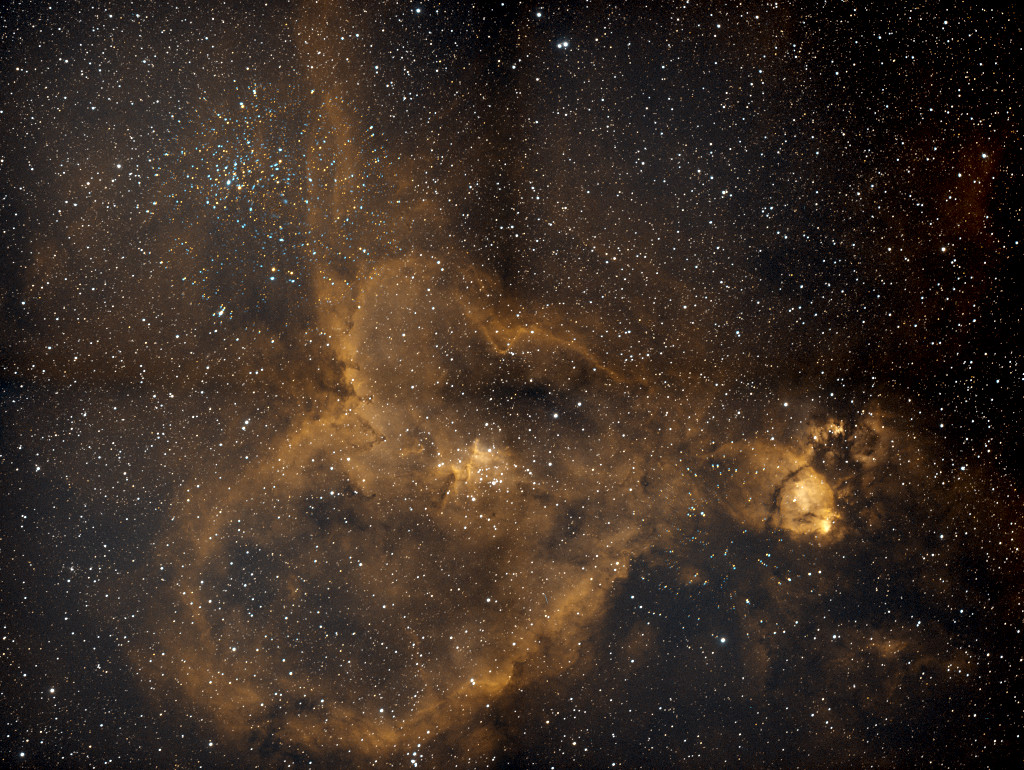
Thought I would rework the data of the Heart Nebula IC1805, I have managed to obtain some darks and bias frames. So I loaded everything into Astro Pixel Processor and started the registration and integration process. I’ve now discovered that there must have been some alignment issues during capture as there is a distinct rotation artefact in the top left frame. Still, this one has more contrast, and we can see more detail than before.

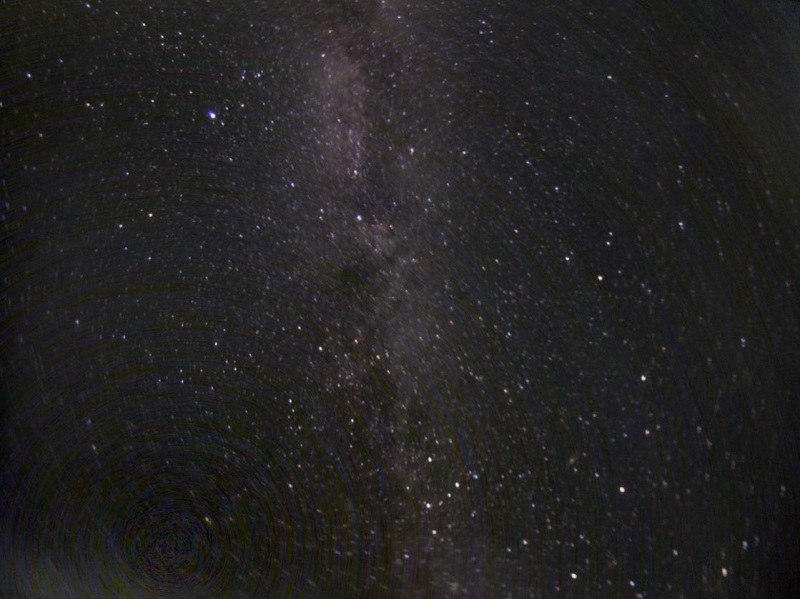
Now my ASI120MC-S is no longer my guide camera, I mounted it on a ordinary camera tripod and tried a few All Sky exposures. Because we’re not tracking or even aligned the result isn’t great quality, but you can make out an arm of the milky way.
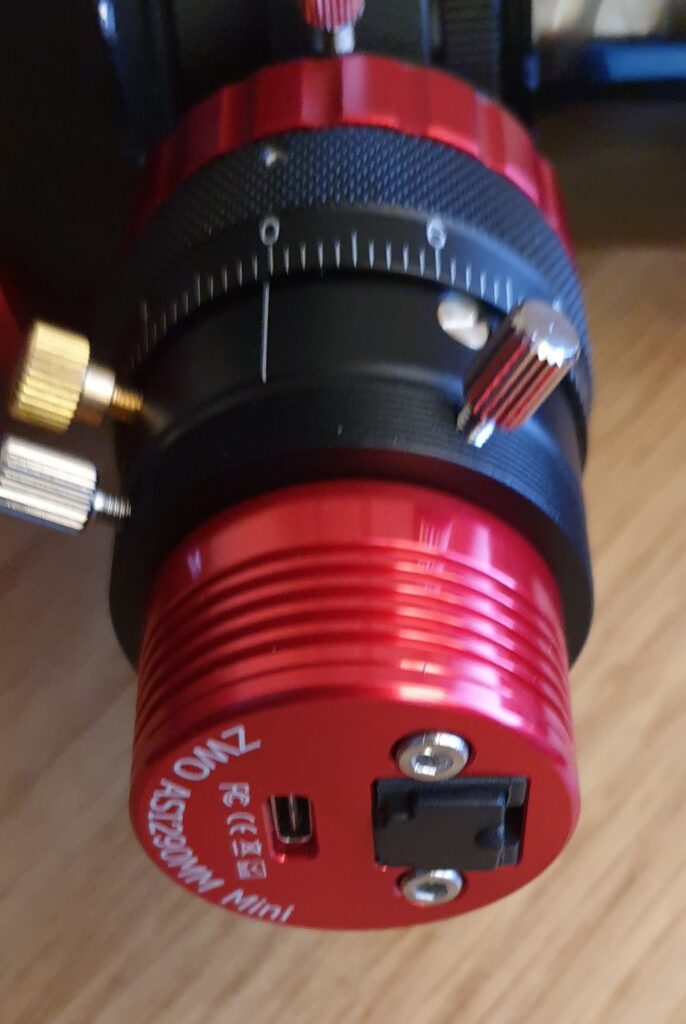
So, at last the ASI290MM mini & Helical Focuser have arrived. This will hopefully be a significant improvement to guiding.
But first, some backstory.
Back when I went and got my main imaging camera, the ASI1600MM Pro, I bought the set of the 8-slot Filterwheel, all the filters (L,R,B,G,Ha,OIII,SII) and an Off-Axis-Guider (OAG). I was looking for a reasonable guide camera to attach to the OAG. The long list of equipment for the imaging train meant that my budget was somewhat limited. I chose the ASI120MC-S.
Really, the ASI120MC-S does guide quite well, but it is not entirely suited to the task. Firstly it is a colour planetary camera. Colour is not necessarily of any use when guiding, and might even hinder it for all I know, but at the time, completely new to astrophotography (and not really experienced now!). I thought, well, it will probably work for guiding, and I might be able to use it for other things too. In any case that’s what I got, and it has served me well for guiding.
Recently I’ve been looking to see whether I could get some improvement in this area, and eventually decided that the ASI290MM mini might suit pretty well.
Let’s look at some comparisons from the graphics at the ZWO website. First, the ASI120MC-S
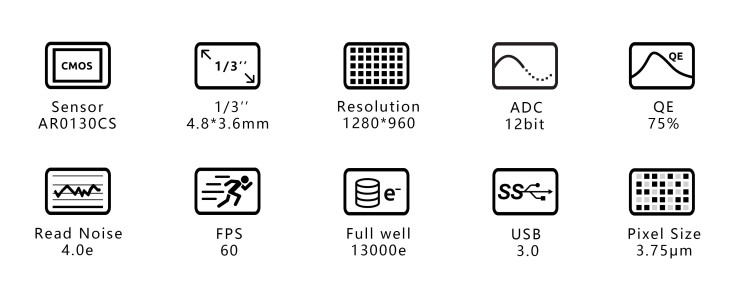
Now, the ASI290MM mini:
OK, so the sensor on the ASI290MM is bigger, but so is the resolution, the pixel size on the 120 is 3.75 um, the specs don’t highlight that on the ASI290MM, but I believe the pixel size on that is 2.9 um. The read noise on the ASI290MM is a lot lower, also note that on the mini it is USB2.0 rather than USB3.0, which probably counts for why the frame rate on the AS120MC-S is higher. It is difficult to compare QE between the two, the MM mini slightly higher.
Clearly with the ASi120MC-S having a full well 13000, capable of higher frame rates, seem to lean that this is a camera meant for planetary imaging, which can do guiding, whereas the ASI290MM mini is a guide camerea, that you might be able to do some mono planetary imaging. So the mini is squarely aimed at guiders, and I hope it will excel at first light.
The areas where the ASI120MC-S excels at better than the ASI290MM mini are not significant for guiding, and the areas where the ASI290MM is better (lower read-noise, more pixels, lower pixel size) are all areas which should improve guiding, hopefully allowing me to reduce exposure times and cope with the small amount of light pollution I sometimes have.
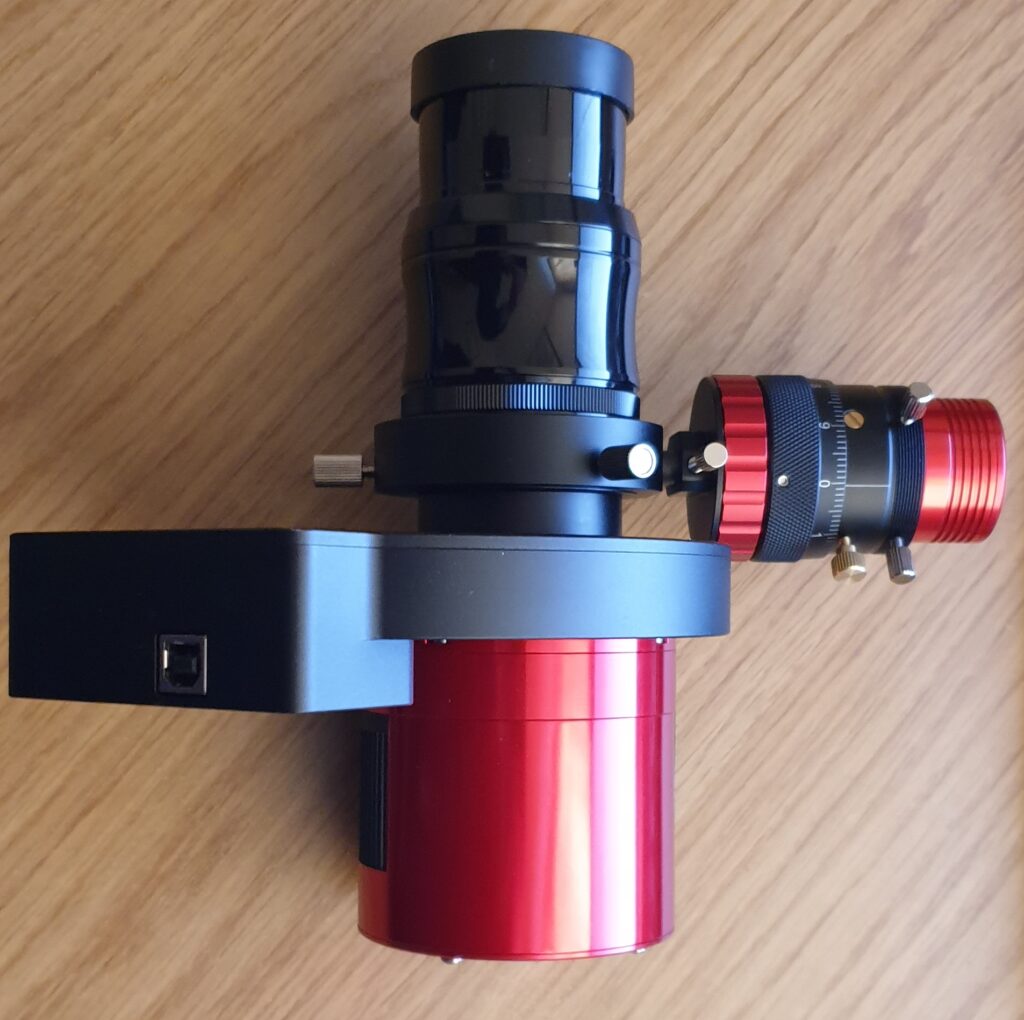
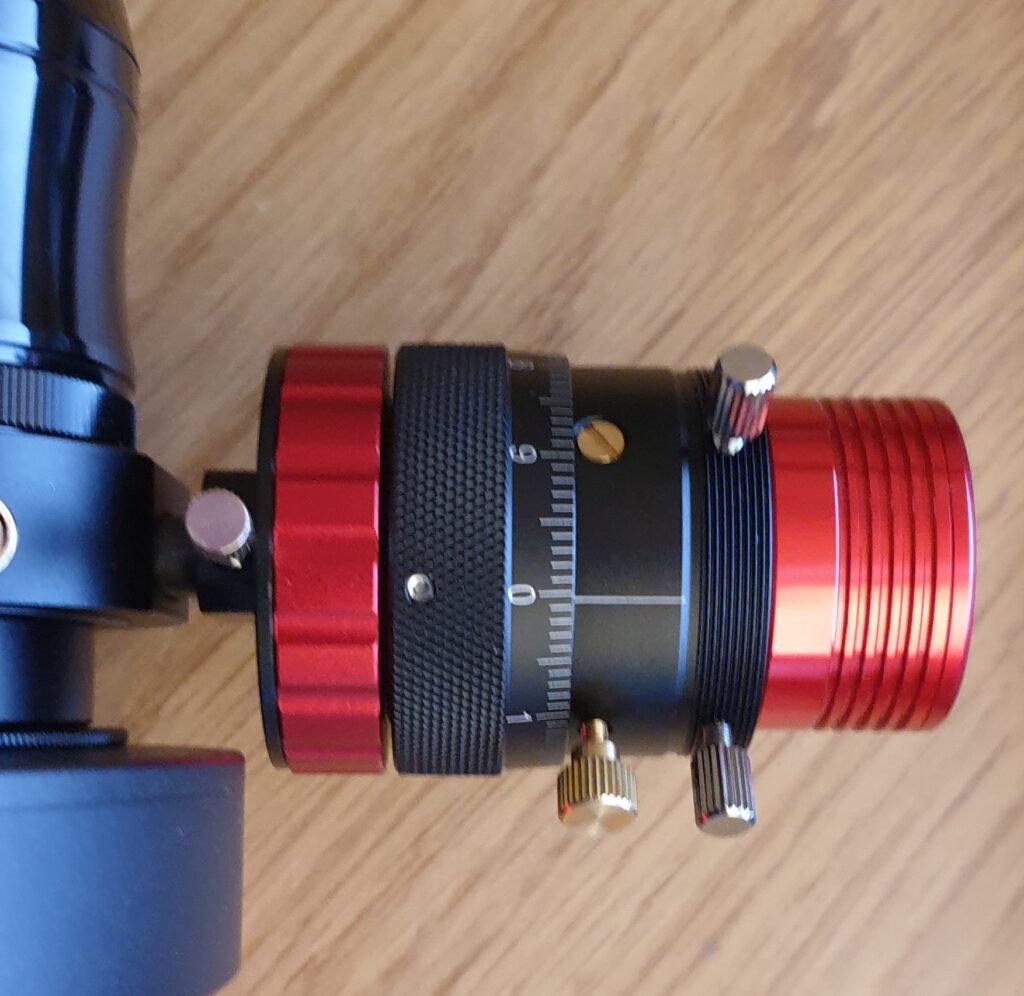
Here are some pictures of the imaging train:
Update:
So I had my first outing with using the ASI290MM mini as a guide camera last night. I can confirm that the camera behaves as a distinct step up when compared against the ASI120MC-S. Firstly, with exposures set to 1s and binning set to 2×2 I was able to constantly guide without losing a star for quite a few hours, and the only times I lost guiding was when I attempted more aggressive settings. The frame acquisitions during guiding showed considerably less noise, and it should be noted that I was guiding without any dark or calibration frames. The helical focuser was great as well, I was able to quickly use ASICAP on my Tablet to ensure that the guide camera became parfocal with the main imaging camera. It literally just took a few seconds, and the position was easily locked into place with the thumbscrew. My experience of trying to use the adjustments on the OAG previously had led to a lot of frustration messing about with Alan keys in the dark trying to achieve some sort of focus. The clamp on the helical focuser also allows for rotating the guide camera to ensure that it is somewhat aligned properly with the mirror and/or the main camera. I’m of the opinion that with time, and the upcoming upgrades to OTA and focusing I will routinely be achieving sub-arcsecond guiding.
So, it is estimated to be a wait of 5 more weeks before I get the Apochromatic Esprit 120. For the time being I’m messing around with the Startravel Achromatic.
Here is last nights attempt at HOO 4-pane mosaic of the Heart Nebula, each pane is 5 x 300s exposures.
I have not done any calibration frames for this set up as I am going to overhauling a lot of the equipment soon, which is why you see some mosaic artefacts between the merged panes.
